How To Do Email Marketing With Mailchimp
1. Email Marketing Basics
There are several important tips about email marketing that I would like to share them with you.
Goal
Always have a goal when you want to create and email list and send them emails. If you don’t know where you want to go, you can never get there. I always write down the main goal that I have and put it on the wall next to where I work,Like :
- What type of product I want to market?
- What kind of people I want to effect?
- What is my niche
- …
Provide value
Don’t always sell your product to people, it will annoy them. You must mostly provide value and between them make some offers. The best result that I received was 4 times providing value and 1 time promoting my product.
Consistency
People must always remember your name, and the best way to do it is to remind them over and over. If you really want to do it right I suggest to mail them at least 2 times a week. Provide value, give them information, let them know you are there.
High quality list
Some people buy a list of emails and try to mail them and promote their products but this doesn’t work. Your audience must be targeted. They must have some interest in your products and what you are doing, otherwise you are wasting time and energy. Try to build your list little by little but make a good one.
2. Setting up a mailchimp account
To set up a mailchimp account, please open mailchimp.com and click on sign up at the top right side of screen. Then write your email, a usernam and a proper password. Then you will receive an email, open it to activate your account.
Then there are 5 steps that you have to provide info such as, first & last name, name of your business and website ( remember that if you don’t have a website, you can provide your Facebook or Twitter account). On the next step you have to provide you address. The next step is asking you if you sell online on any platform and if you do, mailchimp will connect and help you to have a better sale. And finally you can connect your mailchimp to your Facebook or Twitter.
You can setup your mailchimp account for free, but as you grow you may need to upgrade your account to a paid plan. Click here to check out the pricing. If you have under 2,000 subscribers and send less than 12,000 emails per month, you can use mailchimp for free, but above that you have to change to a paid plan.
3. How to create a list
Go to your mailchimp account and at the top right side click on “Create List”. On the next page you have to :
- select a proper name ( your subscribers will see it )
- email address that people will reply to
- A form name who your emails will come from
- A sentence that remind people why they are receiving your mails
- Company name
- Address
Congratulation, your mailing list is ready.
4. How to import email list
By the end of this lecture you will have a your email list started and rolling.
So how you can import your existing email contacts to the list we just created?
- Step 1: In your mailchimp account click on Lists and then select the list we just created.
- Step 2: From the menu under your list name select “add contacts”
Now you have 2 options, adding emails one by one, for the time that you have couple of emails you want to add, or import an excel file of many emails into your mailing list. Let’s select the first option, add a subscriber.
In this page you have to at least write the email address and submit, but beside that if you have other information such as name, last name, address, phone number and so on, you can import them too and also I suggest that. Then at the bottom of the page check the option “This person gave me permission to email them” and then click on subscribe.
On the second option you can choose the format of your file that you want to import (csv, txt, …) and click next at the bottom of the page. On the following page you have to upload your file and give some time to mailchimp to process your information. After that mailchimp will recognize some of the information like, email, first name or last name, but there may be some other information such as position, location and so on that you have to choose a title for it so mailchimp can understand it. Also you have the ability to remove the columns that you don’t need in your mailing list. After that hit done and you are good to go.
Now the big question that how to build your email list from nothing into couple of thousands in 1 hour?
5. Build your mailing list from nothing into …
By the end of this lecture you will have a powerful mailing list with couple of thousands of targeted subscribers.
Generally you have to create sign up forms and put it on your website or social media and ask people to subscribe you but there are some other ways that can help your junp into a whole new level under 1 hour.
Most of us already have a Linkdin account with couple of hundreds of connections, but even if you don’t have don’t worry, you can build a powerful and rich account in couple of hours with hundreds of connections. After signing up on Linkedin and completing your profile, at the top bar search for a position or job that your targeted subscribers must have. For example if I want to sell digital marketing course, first I must ask myself who needs it. It can be students who are studding marketing, small businesses and entrepreneurs, people who are already working as a marketing guy and so on.
So search for the position of your potential subscriber and send them friend request. People are more comfortable accepting your friend request on Linkedin comparing to other platforms because it is all about business. This way you can create a potential targeted connections and then we will import all of their info into our mailing list.
How to export Linkedin contacts?
You can export a CSV file of your connections from the Contact Settings page on the LinkedIn desktop site.
Important: Only the contact’s full name, email address, current employer, and position are exported.
To export LinkedIn connections:
- Click the My Network icon at the top of your LinkedIn homepage.
- Click Your connections on the left rail.
- Click Manage synced and imported contacts near the top right of the page.
- Under Advanced actions on the right rail, click Export contacts.
- You may be prompted to sign into your account.
- Click Request Archive.
- You will receive an email to your Primary Email address which will include a link where you can download your list of connections.
For more information click here.
Gmail
How to export your contacts from Gmail or any other mailing services?
- From your Gmail account, choose Gmail >Contacts
- Select More >Export.
- Choose the contact group you want to export.
- Choose the export format Outlook CSV (for importing into Outlook or another application).
- Choose Export.
- When prompted, choose Save As, and browse to a location to save the file.Note: Google does not export the photos of your contacts.
For more information click here.
Now you can do the same process with other mailing services, and for more help either go to Google and search for “export ‘your mailing service’ contacts”. Also you can try the same thing on other platforms that you have friends or connections, it may give you the ability of exporting.
6. Sign up forms
To be able to work on your sign up forms, first select your list. From the top menu select sign up forms, then you will see 4 different options:
- Form builder
- Embedded forms
- Subscriber pop up
- Form integrations
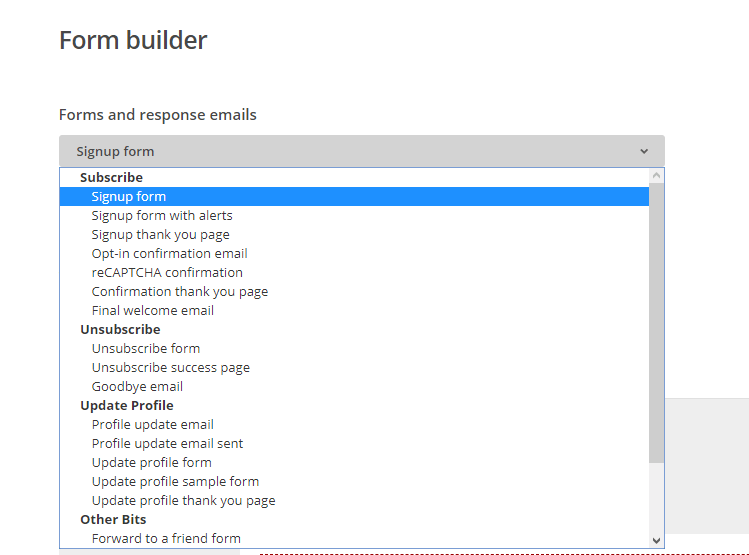
To prepare and edit any type of forms you must select the first option which is “Form Builder”. On the next page, the first window will define the type of your form such as sign up forms, final welcome, unsubscribe form and so on. So if you want to edit any type of forms you can select them here and start working on it.
At the bottom of the page you will see another window which give you the ability to build your forms, add or remove fields, change texts, change colors and much more.
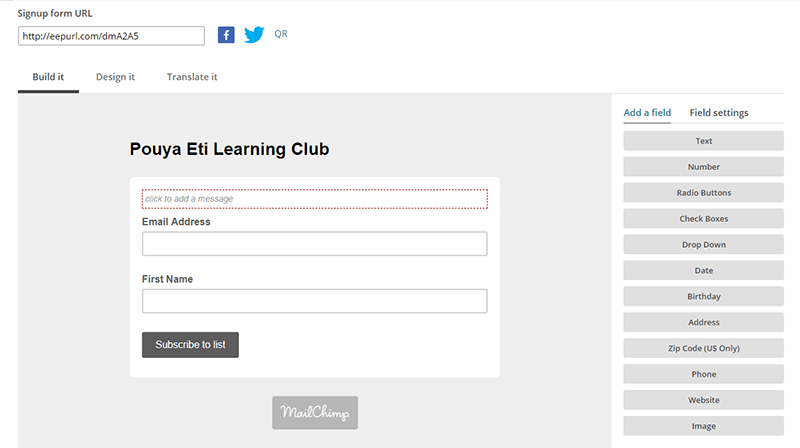
If you pay attention to the image above, at the top of the image there is a URL link. You can use this link to get subscribers without having a website. Just share the link in your social medias or any other location which you may have some connections.
Import the form into your website
To import the forms that you built you have to go back the sign up forms and now you have 2 options, embedded forms or subscriber pop up. You can select either of them depending on your needs and on the next page it will give you a code to copy and paste it into your website. If you select embedded forms, you should copy and paste the codes anywhere you want them to appear. If you select subscriber pop up, you should paste the code at the header of the page you want it to appear.
7. Create Campaign
Campaigns are for preparing an email and send it to your list and all you have to do to start is to click on “Campaigns” from the top menu. Then on the right side of the screen click on “Create Campaign”. A pop up page will appear and ask you to select one of the options below:
- Create an Email
- Create an Ad
- Create a Landing Page
For now we will only focus on creating an email. On the next step select your campaign’s name and click on begin. Now you have to complete 4 tasks which are:
- To whom you send
- From who it comes
- What is your subject
- What is your content
For the first step you have to select one of the lists that you have your account. It will offer you different options such as all subscribers, new subscribers, active subscribers and so on. You can select one of them as you wish and on the next line you can personalize your mail by adding their name.
For the next step, you should select from who this email is coming. A name and email address must be provided.
For the next step you have to write your subject. To increase the attraction you can use emoji .
On your final step you have to design your mail content. For that you can use prepared layouts and themes. Depending on the content of your mail you can select the best fit, for example if you want to sell your product there are couple of good themes for that. After selecting a theme or layout, you have to import information such as text and images into your mail content.
You can add or remove elements from your theme or layout using the right side bar. When you are done click on next and your content will be ready.
Congrats you are ready to send your first email to your mailing list.
8. Reports
After creating your campaign and sending it to your list, you can click on the “Reports” from the top menu to see the analytics of your campaign. On the following page you can see an overview chart from all of your campaigns over the time. Select the campaign you want to see the overview.
On the next page you can see specific actions, how many people opened your mail, how many of them clicked on links and how many unsubscribed.
Am half way through this course and Udemy and it has GREAT value. Thank you.
Good quality course
Love that you have written notes of the course. Some people, like myself, prefer to read to learn as well as use audio. I’m only halfway through the course but I’m definitely learning a ton and see myself buying more courses from this Instructor in the future
Thank you so much for writing such a nice post.